Skill guide · Transportation
Land Navigation Without GPS
The Transportation chapter's Tier 3 Land Navigation item names dead-reckoning and terrain-reading as a genuinely different skill from following a paper map on existing roads. This is that skill: orienting a map and compass correctly, counting distance by pace, reading terrain features, and knowing which natural-navigation folklore actually holds up.
Download this guide as PDFOrienting a map and compass
A baseplate compass (a flat, clear rectangle with a rotating dial) is the right starting tool, not a military lensatic compass; it's simpler to learn on and does everything a beginner needs.
- Lay the compass baseplate along a north-south reference line on the map, either the map's own border (true north) or a printed UTM grid line (grid north). These two aren't quite the same line, a small "grid convergence" gap exists between them that grows the farther you are from the center of the map's UTM zone, but for basic orienting and short-distance navigation either works fine.
- Rotate the dial so its orienting lines match that same north-south line, with north on the dial pointing to the top of the map.
- Holding the map and compass together as one rigid unit, turn your own body until the red end of the magnetic needle falls inside the dial's orienting arrow, a step commonly called "red in the shed." You're rotating map and compass together, not the compass alone while the map stays put.
- The map is now oriented to match the real terrain around you: features on your left on the map are on your left in the field.
Don't skip declination, and know which direction to correct
A phone's GPS is a real backup, not a replacement for these skills
Taking and following a bearing
Orienting the map tells you which way is which; taking a bearing is how you actually walk from where you are to a specific point you can see on the map but maybe not in front of you.
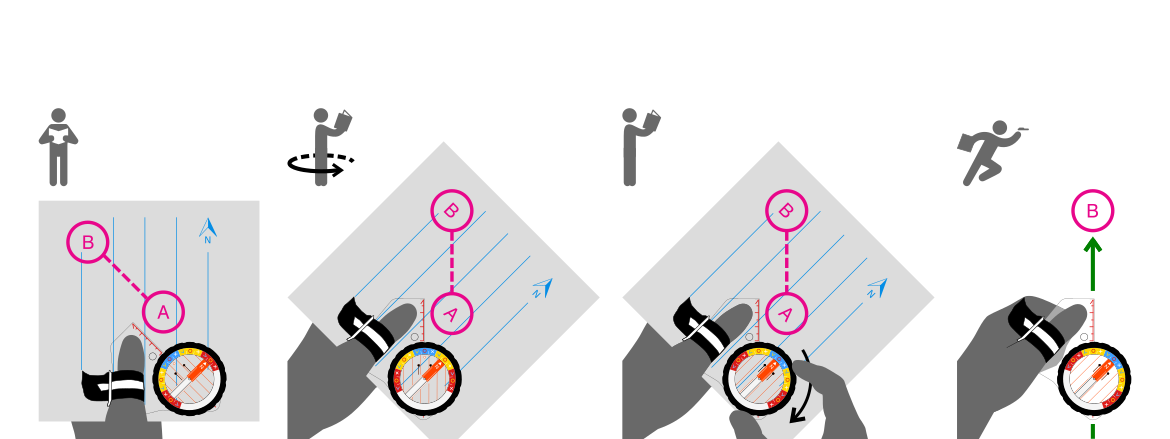
- Lay the compass baseplate's edge along the straight line connecting your current position to your destination on the map, with the baseplate's direction-of-travel arrow pointing toward the destination, not back toward you.
- Holding the baseplate still, rotate the dial until its orienting lines and arrow align with the map's own north-south lines, north on the dial matching north on the map.
- Read the bearing in degrees where the dial meets the fixed index line on the baseplate, then apply your declination correction from the note above.
- Hold the compass flat in front of you and turn your whole body until the needle boxes inside the orienting arrow again, the same "red in the shed" check as before. The direction-of-travel arrow now points the way to walk.
- Pick a landmark in that exact direction, a distinct tree, rock, or terrain feature, and walk to it rather than staring at the compass the whole way; re-check your bearing once you reach it and pick the next landmark. This is what actually keeps you on line over distance.
Watch it: REI, "How to Use a Compass: Compass/Map Navigation".
Finding your own position first: resection
Taking a bearing assumes you already know where you are on the map. When you're not sure, resection finds that starting point using terrain you can actually see:
- Identify two or three recognizable features around you that you can also find on the map, a peak, a tower, a distinct bend in a ridge or river.
- Take a magnetic bearing to each one with your compass, correcting for declination the same way as above.
- Convert each bearing to its back azimuth (add 180 degrees if the bearing is under 180, subtract 180 if it's over).
- From each identified feature's position on the map, draw a line running in the direction of its back azimuth.
- Where the lines cross is your position. Two features can work, but three lines forming a small triangle rather than a single clean intersection is a useful accuracy check, your real position is inside that triangle.
A basic fixed compass like the Suunto A-10 NH (roughly $24) is enough to learn on. A compass with an adjustable declination ring and mirror sighting, like the Silva Ranger 2.0 (roughly $75), removes the manual-correction step and aims more precisely, worth the upgrade once the basics are solid.
Pace counting: measuring distance without a GPS
Pace counting turns your own stride into an odometer, walk a known distance, count your steps, and you have a personal conversion factor for judging distance in the field.
Warning
Two different counting conventions exist, know which one you're using
To find your own count: measure out a known 100-meter (or 100-yard) stretch, walk it naturally at a normal pace several times, and average your count. Terrain changes your count, uphill, deep snow, and heavy brush all shorten your stride, so a serious navigator keeps separate counts for flat ground versus rough terrain. A simple pace-counting bead string (or just knots on a cord, moved one per 100 meters) keeps track without doing mental math while walking.
Turn your calibration walk into a distance tool. Each line combines with the one above it; a rule marks a line that's an answer, and a plain number with no blank is a fixed part of the formula, not something to look up.
Worked example: a calibration walk of 100m takes 65 paces (double-step convention). 100 ÷ 65 ≈ 1.54 m/pace. Later, counting 120 paces to a landmark: 120 × 1.54 ≈ 185m walked.
Enter your own calibration and field counts below to run the same math instantly.
Step 1: Calibrate
Step 2: Apply in the field
Reading terrain, not just the map
Certain terrain features are useful specifically because they're hard to miss, which makes them reliable navigation aids even with an imprecise pace count or a rough bearing.
| Feature | What it means for navigation |
|---|---|
| Handrail | A linear feature, a stream, ridge, or fence line, that you deliberately follow alongside rather than trying to walk a precise bearing |
| Catching feature | A large, unmistakable feature (a road, river, or ridgeline) beyond your destination that tells you you've gone too far if you reach it |
| Saddle | A low point between two higher points on a ridge, often the easiest place to cross |
| Draw | A small valley feature that channels water downhill, usually easier walking than the surrounding slopes but can dead-end or steepen |
| Ridge | High ground connecting peaks; generally easier, more open walking than valley bottoms |
Plan a route around these features deliberately: pick a handrail to walk beside, and set a catching feature past your destination so you know when to stop even if your bearing was slightly off. This terrain vocabulary comes from the Army's FM 3-25.26 land navigation manual, chapter 11.
Natural navigation: what actually works, and what's folklore
A lot of natural-navigation advice repeated online is exaggerated or flatly wrong. Some of it deserves the opposite correction, it's more reliable than its reputation suggests.
| Method | Verdict |
|---|---|
| Moss grows on the north side of trees | Unreliable. Moss grows wherever it's damp and shaded, which depends on local tree cover, slope, and microclimate, not a consistent compass direction. |
| Shadow-stick method (track a stick's shadow tip to find east-west) | Genuinely one of the more reliable natural-navigation methods, usable year-round at most latitudes. Accuracy actually depends on time of day, not season: it's most accurate within about 2 hours of local solar noon, and error grows well beyond that, worst near sunrise and sunset. |
| Using a watch as a compass (point hour hand at sun, bisect to 12) | Works roughly, but has a documented error of about 15 degrees during Daylight Saving Time since the method assumes standard time. Correct for it by using the 1 o'clock mark instead of 12 while DST is in effect, or mentally subtract an hour from the watch first. |
| Navigating by Polaris (the North Star) | More accurate than its casual reputation suggests: Polaris currently sits roughly 0.5-0.65 degrees from true celestial north (slowly shrinking toward a minimum around the year 2100). The real risk is misidentifying which star is Polaris in the first place, not the star itself being imprecise. |
| Following a stream or watching bird flight lines to find civilization | An oversold heuristic. Streams don't reliably lead to people, and bird flight patterns are not a dependable directional signal. |
Sources
- Map and compass technique, declination, terrain association vocabulary (handrail, catching feature, saddle, draw, ridge): U.S. Army FM 3-25.26, Map Reading and Land Navigation, Chapter 11
- Declination lookup: NOAA National Centers for Environmental Information
- True north vs. grid north (UTM) vs. magnetic north, and the grid-magnetic (GM) angle printed on some topo maps: USGS
- Phone GPS as a navigation backup, offline maps, and battery conservation in the field: RECOIL OFFGRID
- Pace-counting convention (double-step method): Scouting America, Orienteering merit badge
- Polaris accuracy and natural navigation method reliability: U.S. Army FM 3-25.26; standard celestial navigation references
- Compass bearing procedure and declination correction mnemonic: REI Expert Advice; REI Expert Advice
- Resection technique: U.S. Army FM 3-25.26, Chapter 11
- Shadow-stick method accuracy and solar-noon timing: Salt & Prepper
- Watch-compass Daylight Saving Time correction: NITE Watches
- Current Polaris offset from celestial north: EarthSky