Skill guide · Access & Functional Needs
Home Accessibility Modifications
The Access & Functional Needs chapter names temporary ramps, wider doorways, and grab bars as practical modifications worth making, without covering how. This guide covers the real slope ratio a ramp needs to be usable, why a grab bar has to go into a stud and nothing else, and the cheap fix that solves most doorway-width problems before anyone reaches for a saw.
Building a temporary ramp
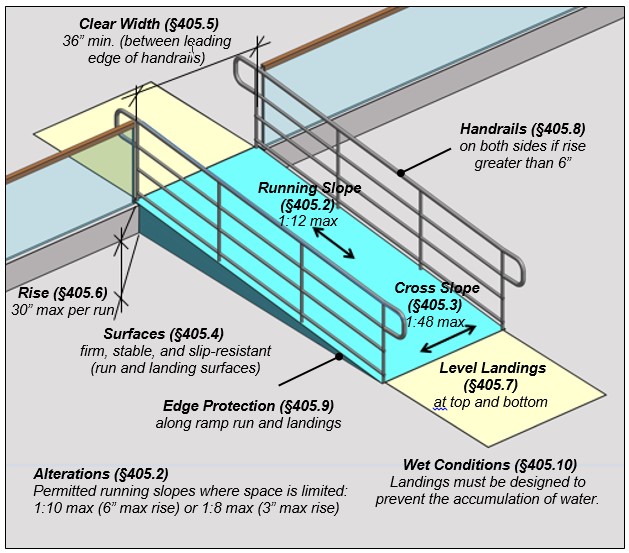
Slope is the number that actually matters, and it's expressed as a ratio of rise to length: 1 inch of vertical rise for every 12 inches of ramp length (a 1:12 slope) is the standard accessible ratio. A gentler 1:16 slope is easier to push a manual wheelchair up; 1:20 takes even less effort but needs more length and material to cover the same rise. A short, steep plywood ramp that technically bridges a single step but doesn't meet something close to 1:12 is usable by an able-bodied person carrying groceries and not much use to anyone who actually needs it.
Worked example: a 7-inch step up needs at least a 7-foot ramp at the standard 1:12 slope (7 inches × 12 = 84 inches = 7 feet).
| Component | Typical spec | Note |
|---|---|---|
| Ramp surface | 3/4" plywood | Full width of the ramp, edges secured with screws, not just nails |
| Stringers (side supports) | 2x8 pressure-treated lumber | Cut to the exact slope angle; the ramp's actual skeleton |
| Cross joists | Every ~16 inches | Joist hangers and screws, not just nails, for real load-bearing strength |
| Handrail height | 34–38 inches above ramp surface | Support posts no more than 6 ft apart, bolted (not just screwed) in place |
Slope isn't the only spec that determines whether a ramp actually works. Build it at least 36 inches of clear width, narrower than that and a wheelchair's own width leaves no margin for error. Include a level landing at least as wide as the ramp and 60 inches long in the direction of travel at both the top and the bottom, and anywhere the ramp turns; a ramp that dumps straight onto a step or an uneven transition at the door creates exactly the hazard the ramp was built to remove. Add a curb or raised edge at least 2 inches high along both open sides wherever the drop-off exceeds about half an inch, without it a wheel can slide off the side, especially in the corner of a turn.
Check local permit requirements before building anything permanent; many jurisdictions allow a temporary plywood ramp without a permit but require one for a fixed structure, and the line between the two isn't always obvious.
Bare plywood gets dangerously slick, and that matters most exactly when Utah weather turns
Grab bars: the one rule that isn't optional
A grab bar has to be mounted into a wall stud, or into blocking installed behind the wall specifically for this purpose, never into drywall alone and never relying on drywall anchors or toggle bolts as the primary support. A properly stud-mounted bar needs to support real force, up to 250 pounds applied at any single point along the bar or its mounting hardware, and a bar backed only by drywall simply can't meet that even briefly, which turns a fall-prevention device into the cause of a fall the moment someone actually leans on it under real weight.
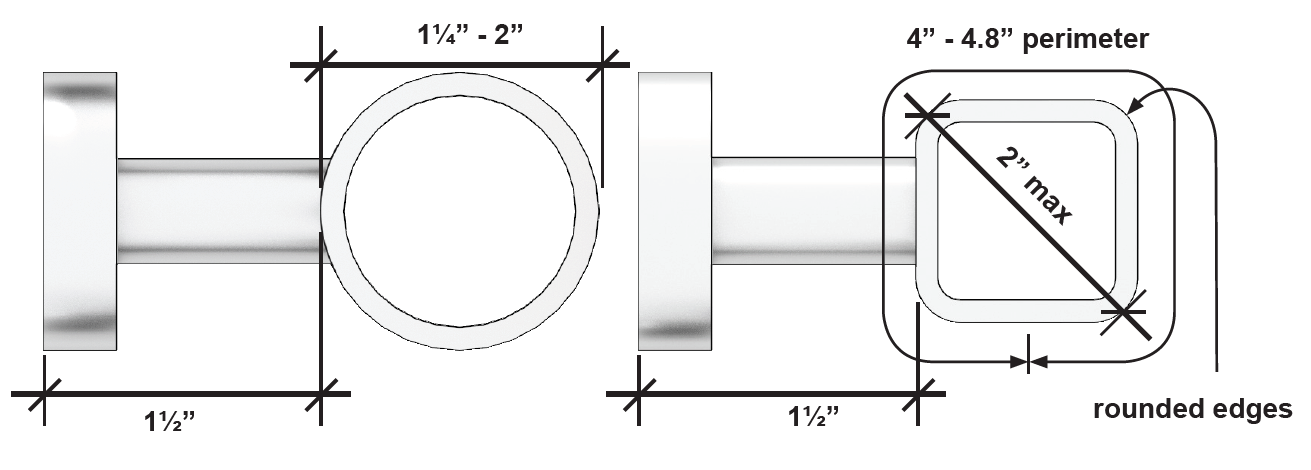
Standard mounting height is 33 to 36 inches from the finished floor to the top of the bar, at the toilet, in the shower, and at the tub; a vertical bar at a shower entry mounts with its bottom edge between 39 and 41 inches up. Buy a bar with a 1.25 to 1.5 inch diameter grip, thin enough that an average hand can actually wrap fully around it, and mount it with 1.5 inches of clearance from the wall so fingers have real room behind the bar rather than getting pinched against the tile. Use a stud finder before drilling, and if a stud doesn't land where the bar needs to go, install a section of solid blocking (a piece of lumber screwed between two studs) behind the wall first rather than compromising on anchor type.
Warning
A grab bar in drywall is worse than no grab bar
Widening a doorway: try the cheap fix first
Standard doorways clear 32 inches with the door open, and many household wheelchairs fit through that, but tighter. Before cutting into a frame, try offset (also called swing-clear or Z-style) hinges: they shift the door's pivot point so the door swings completely clear of the opening instead of eating into it, typically gaining about an inch or two of usable clearance for a relatively small, inexpensive hardware swap that most people can install themselves. Removing the door entirely, or just removing its trim, is the next-cheapest option and can gain meaningful clearance without any structural work at all. Actually widening the frame is a real carpentry project, worth doing for a permanent Tier 3-style modification, but not the first thing to reach for when the goal is a working fix now.
Quick Reference
| Modification | Key number | Cheapest fix first |
|---|---|---|
| Ramp | 1:12 slope minimum; 36" min. clear width; 60" landings | Plywood + pressure-treated stringers |
| Grab bar | 33–36" height, 1.25–1.5" grip diameter; stud-mounted, rated to 250+ lb | Stud finder + blocking if needed, never drywall alone |
| Doorway | 32" minimum clear width | Offset hinges before frame-widening |
Full checklist:
- Ramp slope measured and built to at least 1:12, not just "close enough"
- Ramp surface and stringers rated for real, repeated load, not a one-time-use fix
- Every grab bar located over a stud (or blocking) with a stud finder before drilling
- Grab bar height confirmed against the 33-36" (or 39-41" vertical) standard
- Offset hinges tried before committing to frame-widening carpentry
- Local permit rules checked before any permanent structural modification
Sources
- Ramp slope ratios and construction: Family Handyman; BraunAbility
- Grab bar height, stud mounting, and weight rating: GrabBars.com; AccessibilityChecker.org
- Doorway width and offset hinges: Karman Healthcare; Age Fearless Academy
- Ramp minimum width, landing size, and edge protection: U.S. Access Board; AccessibilityChecker.org
- Grab bar grip diameter and wall clearance: GrabBars.com
- Ramp slip resistance, grit coating options, and winter/ice limitations: No Skidding Products; HandiRamp